By Richard Smith | November 11, 2017
So you have registered for a new Organisation account on Needs & Means, but now what? This article gives you some ideas on how to get started writing your first awesome requirements using Planguage.
- The Project Dashboard page
- Create your first Specification
- Write the summary parameter
- Add a new parameter
- The Specification List and Diagram pages
- We’re done!
1. The Project Dashboard page
When you first log into Needs & Means, you will see the Project Dashboard page of your Organisation’s Default Project. If you are just starting out with Planguage, you can start with that for now.
As you progress, you will probably want to create separate projects, to keep groups of requirements apart from each other.
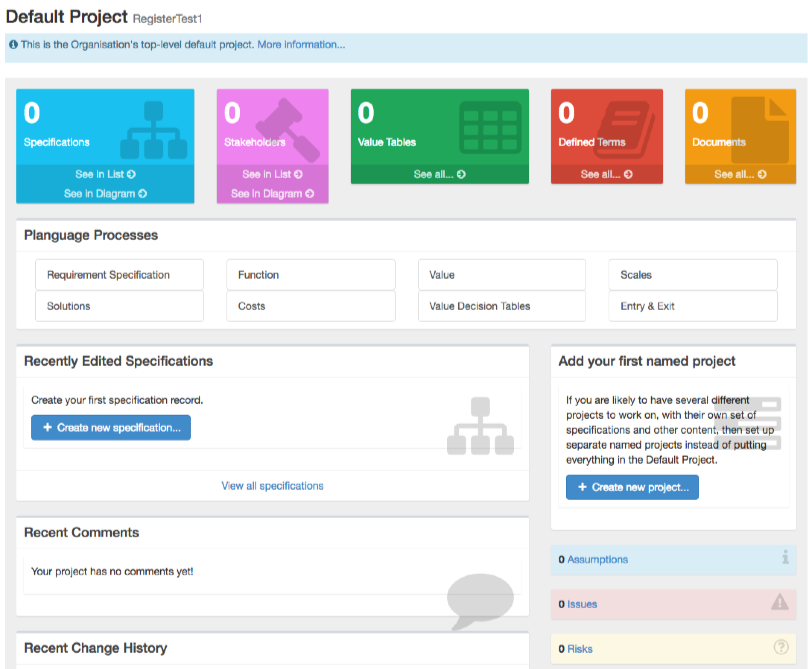
The Dashboard provides a live summary of the contents of your project, recent user activity, and quick links to useful reference information such as Planguage processes and rules.
Each Needs & Means project contains some of the following:
- a database of specifications, that model your project’s stakeholders, goals, functions and proposed strategies and solutions,
- a set of Value Tables, that let you assess the impact of your solutions against your project’s goals,
- a glossary of ‘jargon’ and other defined terms used in your specifications,
- a set of online documents that can contain a mixture of non-specification content (e.g. titles, diagrams) and embedded specification records, which can be exported (printed) from the system.
2. Create your first Specification
In Needs & Means, a Specification refers to a single requirement, stakeholder or design record. Unlike a traditional free-format word-processed ‘functional specification’, the idea is that you build up a rich database of individual records which can then be listed, drawn, filtered, linked, embedded, printed out and generally mucked around with.
The most important benefit of splitting into separate records is that it forces you to think of your requirements as a collection of separate distinct things, rather than text split into a few sections in a document. Once you can do that, your team can start using a bunch of proven engineering techniques and tricks (called “Planguage”) to break down the problem you are trying to solve in a systematic, consistent way. Sound good?
Let’s start at the beginning. We want to create a top-level Specification that captures the overall summary of the problem that your project is focused on. We’re talking about the typical first paragraph in the “Introduction” section of a typical functional specification document.
Follow these steps to open the Create Specification window:
Click on the
 menu button in the header bar
Click on the
 menu item.
This opens the Create Specification window:
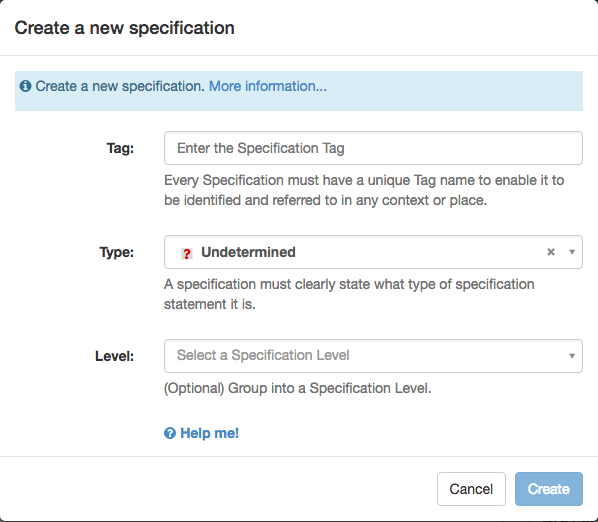
The first thing we must do is give it a unique name (in Planguage, this is called a Tag). We can then use the tag to refer to the record anywhere in our project. As this is going to be our project’s top-level requirement, type in something like “The Project Goal” into the Tag field and then press the Tab key to jump to the next field.

The only other thing we need to consider is to choose the correct Specification Type of our new record. Planguage provides a comprehensive list of Specification Types, each of which has a very specific meaning and intended usage (just like everything else in Planguage!). Think of the Specification Type as giving you a promise of what the record describes (and, by implication, what it doesn’t and shouldn’t specify).
Fortunately, Planguage has a Specification Type that is just what we need here: Mission. To choose it:
- Click the Type field to open the pulldown menu
- Start typing in the word “mission” in the search box. The pulldown list will filter out other values as you type each character
- Scroll and select the “Mission” item from the list.

Once you have created a specification record, you can change any of these fields as often as you like, including the Tag. If you want more details, click on the  link to get some specific guidance for filling in the other fields (go on, click it!).
As you get used to it, you’ll see that choosing the correct Specification Type here is very useful, as it allows Needs & Means to provide some meaningful default content in your newly created Specification.
We’re all done here. Go ahead and click the  button at the bottom of the Create Specification window.
3. Write the summary parameter
The system creates your new Specification Record with default, but empty content:
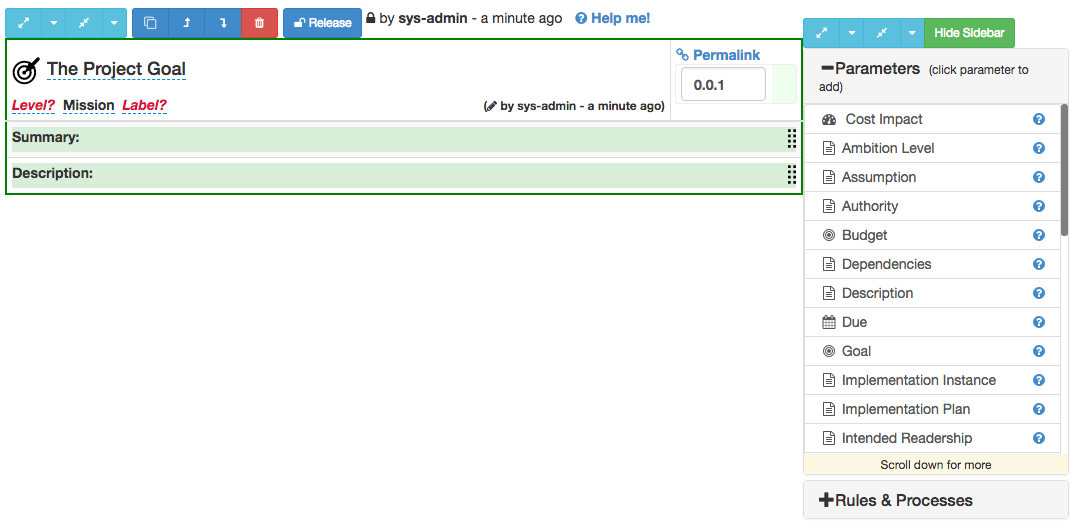
All we know about our Specification right now is it’s name. The rest is a big empty space. As a minimum, before we go on and maybe create further records, we should pause here and write a quick summary so we remember what it was we were thinking about when we created it. It doesn’t need to be S.M.A.R.T. at this early stage, just a quick note to help us (and anyone else reading it) understand the basic idea.
Fortunately, Planguage has a dedicated way for capturing the high-level summary of any requirement: the Summary parameter. In fact, every Specification record in Planguage consists of one or more sub-records, known as Specification Parameters. Each Parameter has a very specific purpose and usage, acting as a promise to the reader to contain certain information about the Specification. Needs & Means includes over 30 of these Parameters, which can be seen in the “Parameters” list in the sidebar on the right-hand side of the Specification page (the full Planguage glossary defines many many more!).
Tip: Move your mouse pointer over each Parameter label in the sidebar or in the Specification record section itself to see a short popup description of each. To see a full page of information and examples on each, click on the
buttons in the sidebar list.
For the Summary parameter, you’re looking to capture an ‘elevator pitch’ - length summary of your specification (in this case, the overall Mission of the project).
Tip: For example, if you have a paragraph or two in an email or existing Word document you can use to start off with, copy that text into your computer’s clipboard (Ctrl/Cmd+C), click into the text field and paste it (Ctrl/Cmd+V).
Remember that a Summary parameter is not supposed to be a statement that is well-written, complete, testable, standalone, measurable … so relax! That’s what the Description parameter is for, but you don’t have to fill that in just yet.
To edit the Summary parameter, simply click somewhere on the Summary parameter header bar; it will open in edit mode:
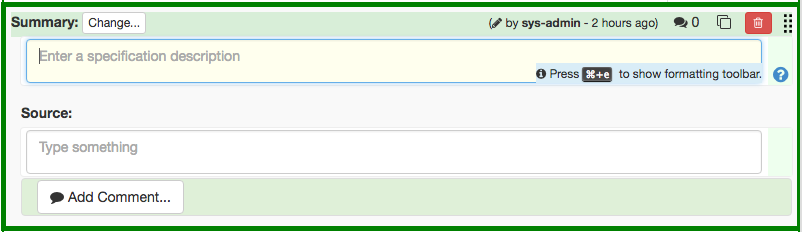
Click in the text box ‘Enter a specification description’ if it does not already contain an edit cursor (also coloured with a yellow background when it is ready to accept keyboard input) and start typing in your quick summary of the project goal or aspirations.
Press the Tab key when you’re done. The system will immediately save your edit (shown by the ![]() icon to the left of the text field). Incidently, you’ll notice that most input fields in Needs & Means work in this way, by saving the field’s contents as soon as you leave the field (e.g. by clicking somewhere elsewhere on the webpage outside of the field, or by pressing the Tab key to move to the next input field or button).
icon to the left of the text field). Incidently, you’ll notice that most input fields in Needs & Means work in this way, by saving the field’s contents as soon as you leave the field (e.g. by clicking somewhere elsewhere on the webpage outside of the field, or by pressing the Tab key to move to the next input field or button).
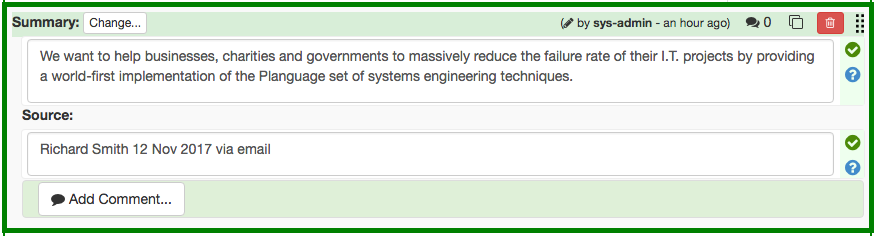
Here’s an example of the completed Summary parameter. We have also filled in the Source attribute, which records where someone could go and find the original information, if they needed more information or wanted to query it.
Every parameter sub-record in Needs & Means has a Source attribute, so please use them! Examples of valid Sources could be emails (sender/date/subject), documents (url/file path location), meeting notes (meeting title/date/attendees), company press releases or sales contracts.
Simply recording the Source of your requirement information is a really powerful, but incredibly cheap risk management tool to help manage change and provide credibility in your project.
Congratulations! You have edited your first Planguage parameter in Needs & Means. You could stop here, go onto step 5 below, or perhaps create another new Specification record straight away (e.g a key Stakeholder in your project’s outcome). Remember, in Needs & Means, you are building a database of inter-related records, which can be done in pretty much any order, and to any level of detail at any point. You’re not writing a “specification document” in the same way you might write a letter or a novel!
That said, let’s see how we can add more parameters to existing Specification records…
4. Add a new parameter
Needs & Means automatically adds a bare minimum of two Summary and Description parameters to most newly-created Specification records. But there is a rich set of over 30 different parameter types that you can add to each Specification record in Needs & Means. Let’s see an example of doing this by specifying the person responsible for the mission statement of your project:
Move your mouse pointer over the vertical scrollbar in the sidebar parameter list and scroll the list down until you see the “Owner” parameter.
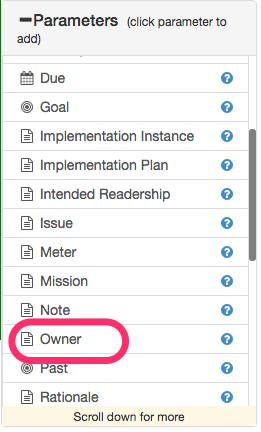
Click anywhere in the Owner list item (except on the right-hand Help icon, which will show the detailed glossary page for the selected parameter)
The parameter is added to the Specification record below the currently selected parameter (the one with the thick green border drawn around it)
The newly-added parameter is automatically selected and opened, ready for editing.
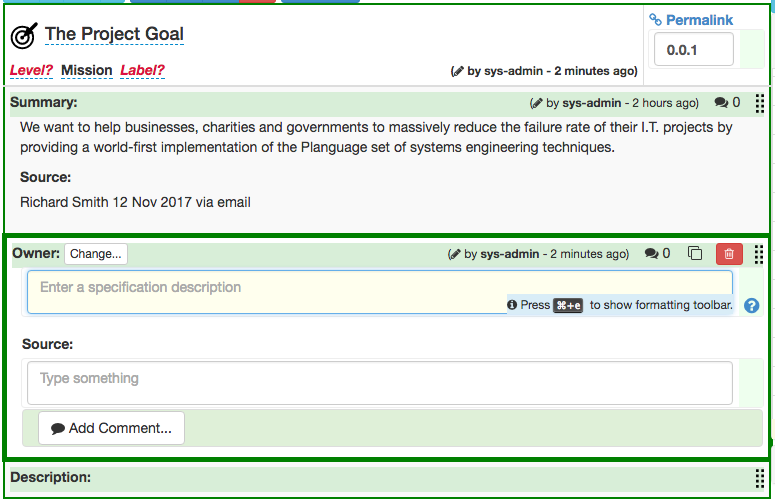
Go ahead and type something into the text field. For example “The CEO”! Don’t forget to make sure the change is saved by the system, as before.
OK, we’re done creating our first Specification record! Let’s see the results of our hard work…
5. The Specification List and Diagram pages
Click on the Release button in the Specification toolbar. This switches the record to read-only mode, by removing the ‘edit lock’ assigned to you initially as the creator of the record. You can now see the Specification in a simplified cleaned-up version.
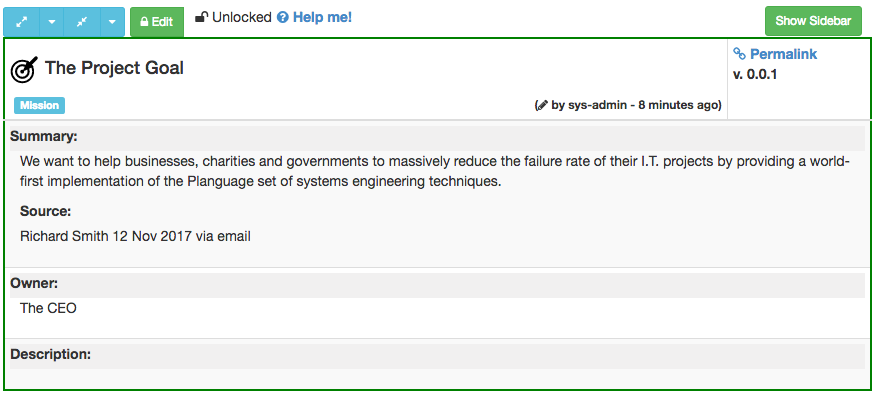
Tip: To be able to edit this Specification again, click the Edit button on it when you are ready to change it in some way.
Note that switching between “releasing” and “editing” Specifications is entirely optional when there is only one User in your Needs & Means Organisation! You could safely ignore this feature until you are collaborating with other users in the same project.
Now click on the  link in the top navigation bar, to show the Specification List page.
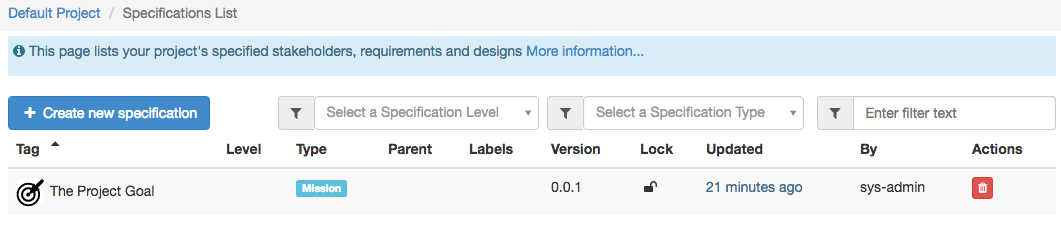
Here, you can always see the full list of Specification records in your project, including requirements, stakeholders and solution ideas. Click on a row in the table to open the Specification record page.
Now click on the  link in the top navigation bar, to show the Specification Diagram page.
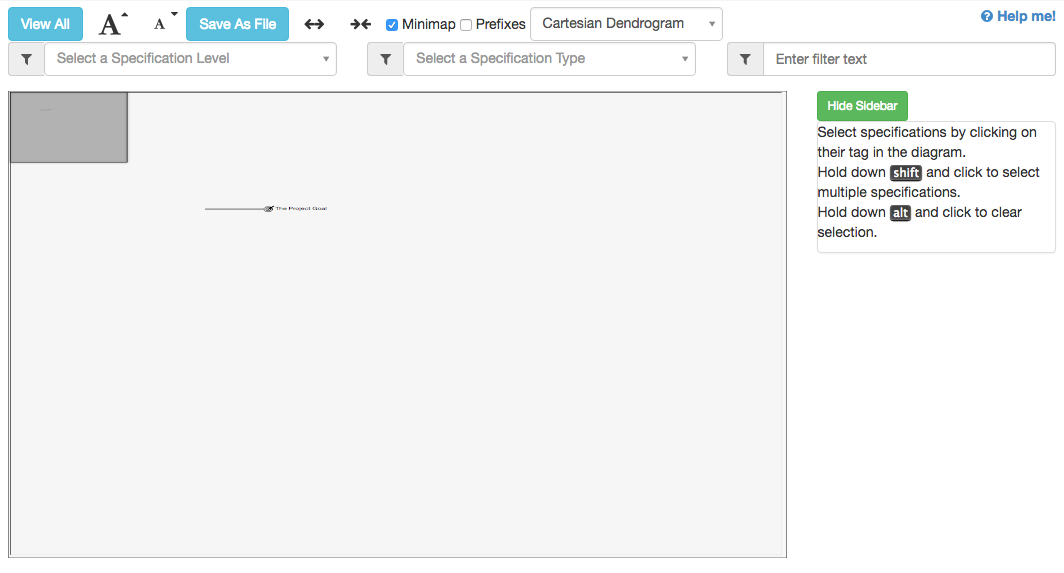
The Diagram page shows all of your Specification records again, but displayed in a hierarchical tree of connected parent / child nodes. OK, so doesn’t look very impressive at this stage as you only have one Specification record in your project!
Move your mouse pointer in the diagram panel and move your mousewheel (if your mouse has one) or trackpad to zoom into the diagram until you can see your record. Go ahead and click on the record’s tag:

Now you have a Specification selected in the diagram, the system shows top-level details and action buttons in the right-hand sidebar.
Go back to the selected node in the diagram, and this time double-click on it. A specification detail page opens up, but this time with a large friendly button inviting you to return the diagram as you left it when you are done viewing and maybe editing this Specification:

Depending on how you prefer to work (visually or textually), you can use the Diagram and / or the List pages to work on the Specifications in your project; they are both functionally equivalent.
6. We’re done!
Well done for making it this far through this tutorial! Let’s recap what we’ve covered:
- The Project Dashboard
- Creating a new Specification record
- Editing a Specification parameter
- Adding a new Specification parameter
- Switching a record between read-only and edit mode (only needed if you have more than one user working in your project)
- Using the List and Diagram pages to view and work with all of the Specification records in your project.
Most importantly of all, you have written your first Planguage Specification!
Once you have grasped these simple techniques, you can create any Specification record you need in the system of any type; they all work the same way.
7. What’s next
Take a look at some of the videos on our Vimeo channel for more details on the Specification page, Value Tables and other key features.
Do get in touch to let us know what else you’d like us to write articles about.